Tutorial Explode! with Lightwave 5-5.6
|
This explosion will be entirely done with Lightwave. The keyboard shortcuts will be indicated in bold font and in brackets. I chose a one page format to make the offline visualisation easier. |
|
Phase 1 : Modeling and surfaces setting |
|||||||||||||||||||||||||||||||||||||||||||||||||||||||||||||||||||||||||||||||||||
|
Modeling We will start by creating a cube in the modeler(shift+x puis n), with the following dimensions:
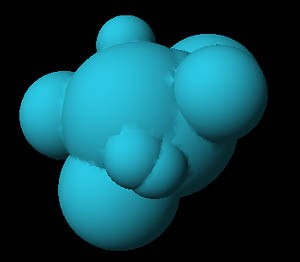
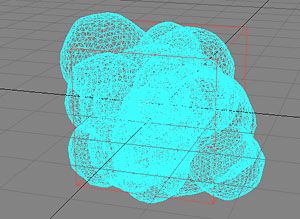
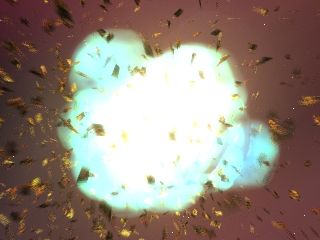
Save as cube.lwo Then we will create the chunks model. In an other layer, create the same cube as before but use 12 for 'Segment' value. Subdivide it with (shift+d). Assign a surface(q) named 'chunks'. Leave the other parameters with their default value. Save as chunks.lwo Modelisation of the explosion gases : Create about 9 spheres in order to reproduce the image below. These spheres must fit in the cube created before.(You can display the layer containing the cube as background layer)
To do this, create a 'Tesselation' type sphere(shift+o then n) with the level 3 option in the new layer. To make the next sphere, go to the following layer, display the layer showing the sphere as a background layer and create the new sphere. Shift its position. Then make a boolean (shift+b) union and merge(m) with 'automatic' option. Return to the first layer and delete the sphere.Create a new one but vary size and position. Go into the layer containing the 'booleaned' spheres, then place the layer containing the sphere we have just created in the background. Redo a boolean operation and merge as before. Start all over again and create approximately 9 spheres. It is rather heavy but necessary. Making unions between each sphere reduces the number of polygons and thus increases the render speed. Save as 'gases.lwo' |
|||||||||||||||||||||||||||||||||||||||||||||||||||||||||||||||||||||||||||||||||||
|
Surface settings Launch Layout and load the object 'chunks.lwo' and 'gases.lwo' In the 'Surface' panel, select the 'chunks' surface and use the values below :
Click on the 'Surface color' 'T' and then use these values:
In 'texture center' you can use the values you want.(You can choose random values, but these values have to be different for each layer of fractal noise) Click on 'Add New Texture'.
Click(it's the last time) on 'Add New Texture'.
Finally click on 'Use Texture'. Click on the'Luminosity' 'T' and use the following parameters :
Click on 'Add New Texture' and use the following values:
then 'Use Texture' The texture chunks is now finished.
The aim is for the surface to look like molten matter. It looks strange for now...
Now the 'gases' setting: Select the 'gases' texture. For a more realistic explosion, move on to the next section. Use these values for the color : 44, 201, 228 (rvb) a turquoise blue. Then
Click on color 'T'. Use these values:
Click on 'Add New Texture'.
Then click on 'use texture' Click on 'Luminosity' 'T' and use these values:
Click on 'Use Texture'
Click on 'Transparency' 'T'. Use these values:
Click on 'Use Texture'. Then on the 'Advanced Options' tab, set the 'Edge transparency' at 'Transparent' and the 'Edge Treshold' at 1.0. Also put the 'Glow effect' at 100% Value for a more realistic explosion : For a more realistic explosion we are going to use colors red and yellow . Use these values for the color : 253, 252, 204 (rvb) a very light yellow. Then :
Cclick on the color 'T' :
Click on 'Add New Texture'.
Then 'use texture' Click on the 'Luminosity' 'T' and use these parametre :
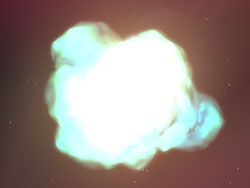
Click on 'Use Texture' Click on 'Advanced Options' tab, set the 'Edge transparency' at 'Transparent' and the 'Edge Treshold' at 1.0. Also set the 'Glow effect' at 100% All the modeling and texturing work is over. The gases texture look like this (it has several 'gases.lwo' objects , a background image and the lights already set) :
To achieve the explosion effect, we will need several copies of the 'gases.lwo' object. |
|||||||||||||||||||||||||||||||||||||||||||||||||||||||||||||||||||||||||||||||||||
|
Phase
2 : Animation
|
|||||||||||||||||||||||||||||||||||||||||||||||||||||||||||||||||||||||||||||||||||
|
Chuncks animation Load the objects cube.lwo. I chose 24i/seconds as time bases . For that, go into the 'Scene Editor ' then in ' frames per Second' ; enter 24. The explosion will start after about a second. The chunks will not appear during this first second. If you want a moving object to explode, you will need to 'Parent' chunks.lwo object to the cube.lwo object (which represents the object you want to explode). In this tutorial, the cube will not move. So we don't need to 'Parent' it. In the ' objects ' panel select 'chunks' as Current Object. Click on 'Appearance Options' tab. Then Click on 'E' near ' Object Dissolve' then create keys at frames 33 and 34 (enter). At 0 and 33 frames, put the value 100%. Set splines in 'Linear' for all keys(s). Click on ' Use Envelope' Now we will deal with the ' Polygons Size' and ' Fractals Bumps' couple. These are the tools which will enable us to make the object burst. Click on the 'E' of 'Polygons Size' and create keys at frames 33, 34 and 120. At frame 34, enter 16% and at frame 120, enter 0%. It is necessary that the splines are in ' Linear'. Click on ' Use Envelope' Click on the 'Deformation' tab and on the 'Displacement Map' 'T'.
The fractal bumps will control the explosion dynamics. The higher the values, the more powerful the explosion. The 'Texture size' parameter will control the chaotic character of the chunks. The smaller the values, the more chaotic the chunks.
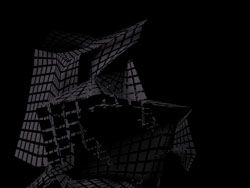
Click on 'Texture Amplitude' 'E' and then create keys at frames 33, 34 and 120. At frame 0, 33 and 34 enter 0. At frame 120 use 33. Splines must be set in 'Linear'.CLick on 'Use Envelope'. The chunks are done. If you do a render test at the frame 44 for example you will see that the chunks are made of polygons. What is rather not beautiful. To arrange this, we will used motion blur. In the ' Camera ' panel set the antialiasing as ' medium' and activate the 'Motion Blur'. Leave the value at 50%. Here is the result(chunks rendered alone):
The polygones take a bit of depth. Save the scene.
Cube Animation In the 'Objects' panel, select the 'Cube.lwo' object, click on the 'Appearence Options' tab and then click on the 'E' of 'Object dissolve'. Create keys at frame 33 and 34. At the frame 34, put the value 100%. Set splines in linear for all keys (s). Click on ' Uses Envelope'.
Gases Animation Here also the gases will be visible only after the first second and will gradually disapear. First 'Parent' the objet gases.lwo at cube.lwo.(if you want) In the 'object' panel select 'gases' as Current Object. Click on the 'Appearance Options' tab. Click on the 'E' near 'Object Dissolve' then create keys at the frames 24, 30, 105 and 120. At the frame 0, 24 and 120 put the value 100%. At frame 30 and 105 enter 0%. Set splines as 'Linear' for all keys(s). Click on ' Uses Envelope' In order for the gases to have an irregular aspect (and to move in time), we will add fractal bumps. In the 'Objects ' panel, click on the 'Deformation' tab and then click on Displacement Map' 'T'. Use these values:
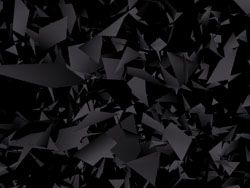
Click on the 'Texture Amplitude' 'E', then create keys at frames 23, 24. At frame 0 and 23, enter 0%, and at frame 24, 0.06. It is necessary that the splines are in 'Linear' Click on ' Use Envelope' and go back in the main screen. Now, in the 'Object' panel, click on 'Object' Clone: enter 2. There are now 3 identical objects ' gases'. Return to the frame 0, affect theirs of rotations randomly then shift slightly their positions. It will look like this:
Then for each sphere create keys at the frame 23, 24 and 48. Return at the frame 0. Then change the parametre ' Size ' as (x)0, (y)0, (z)0. Use also (x)0, (y)0, (z)0 at frame 23. Then at the frame 24 use (x)0;6, (y)0.6, (z)0.6 and finally at frame 48 use (x)1.2, (y)1.2, (z)01.2. To navigate between keys, use the shortcut shift + left arrow or right arrow. The spline must be set in 'Linear' Vous can make a preview between the frames 24 and 120 to see the result (saves, removes the object ' debris.lwo and launch the preview. Once that you have finished seeing reload the scene). Voila the gases are finish.
Save the scene. Lights animation In the ' Lights' panel add a light of the type 'Point Light' and put 'Shadow Type' on 'Off'. Rename it ' flare' and set the color with: 244, 223, 70(rvb) (a clear yellow) Click on the 'Light Intensity' 'E' and create keys at the frame 23, 24, 34, 44, 54, 72, 96 and 120. Put the following values:
Click on ' Use Envelope' Activate the lens flares. Click on 'Lens Flares Options'. Remove all options except ''Fade Off Screen' and 'Central Glow'. Click on the of 'Flares Intensity' 'E' and create keys at the frame 23, 24, 34, 44, 54, 72, 96 and 120. Use these values: (The spline must be set in 'Linear' ):
Click on 'Uses Envelope'. Click on the 'E' of 'Flare dissolve' and create keys at frame 23, 24, 80 and 120. Use the following values (the option linear must always be on):
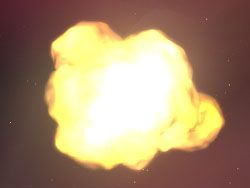
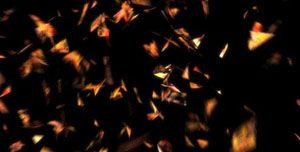
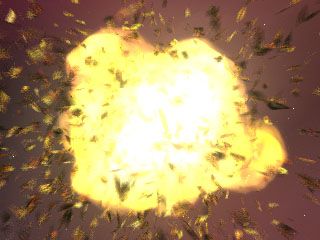
Click on 'Uses Envelope'. It is necessary to 'parent' the light to the object which will explode if it moves. In the Light panel, select the light 'flare' and click on 'Clone Light' and use as value '2'. There are now 3 lights 'flare'. For the second light ' flare' use thes values for his color:252, 222, 160 (rvb) (a clear yellow orange). Return to the frame 0 and shift their positions For the lights, it is finished Setting of the general parameters Camera : position 4.5 cm, 0 m, -4 m (x,y,z). In the 'Camera' panel set the antialiasing on medium and activate the motion blur. Leave value at 50%. Voila it is the end. The gases are much better on a clear background (at least not 'black very dark'). You can launch final calculation. The disadvantage of this method (you will realize it now), it is the slowness of calculation. When you will adapt it to your object you will have to change all the sizes parameters. And before you master the effect, a lot of experimentation will have to be done. Here are some images of the explosion :
If you have any problems : bfv@free.fr
|